Today’s case study is a 2002 Mini Cooper S

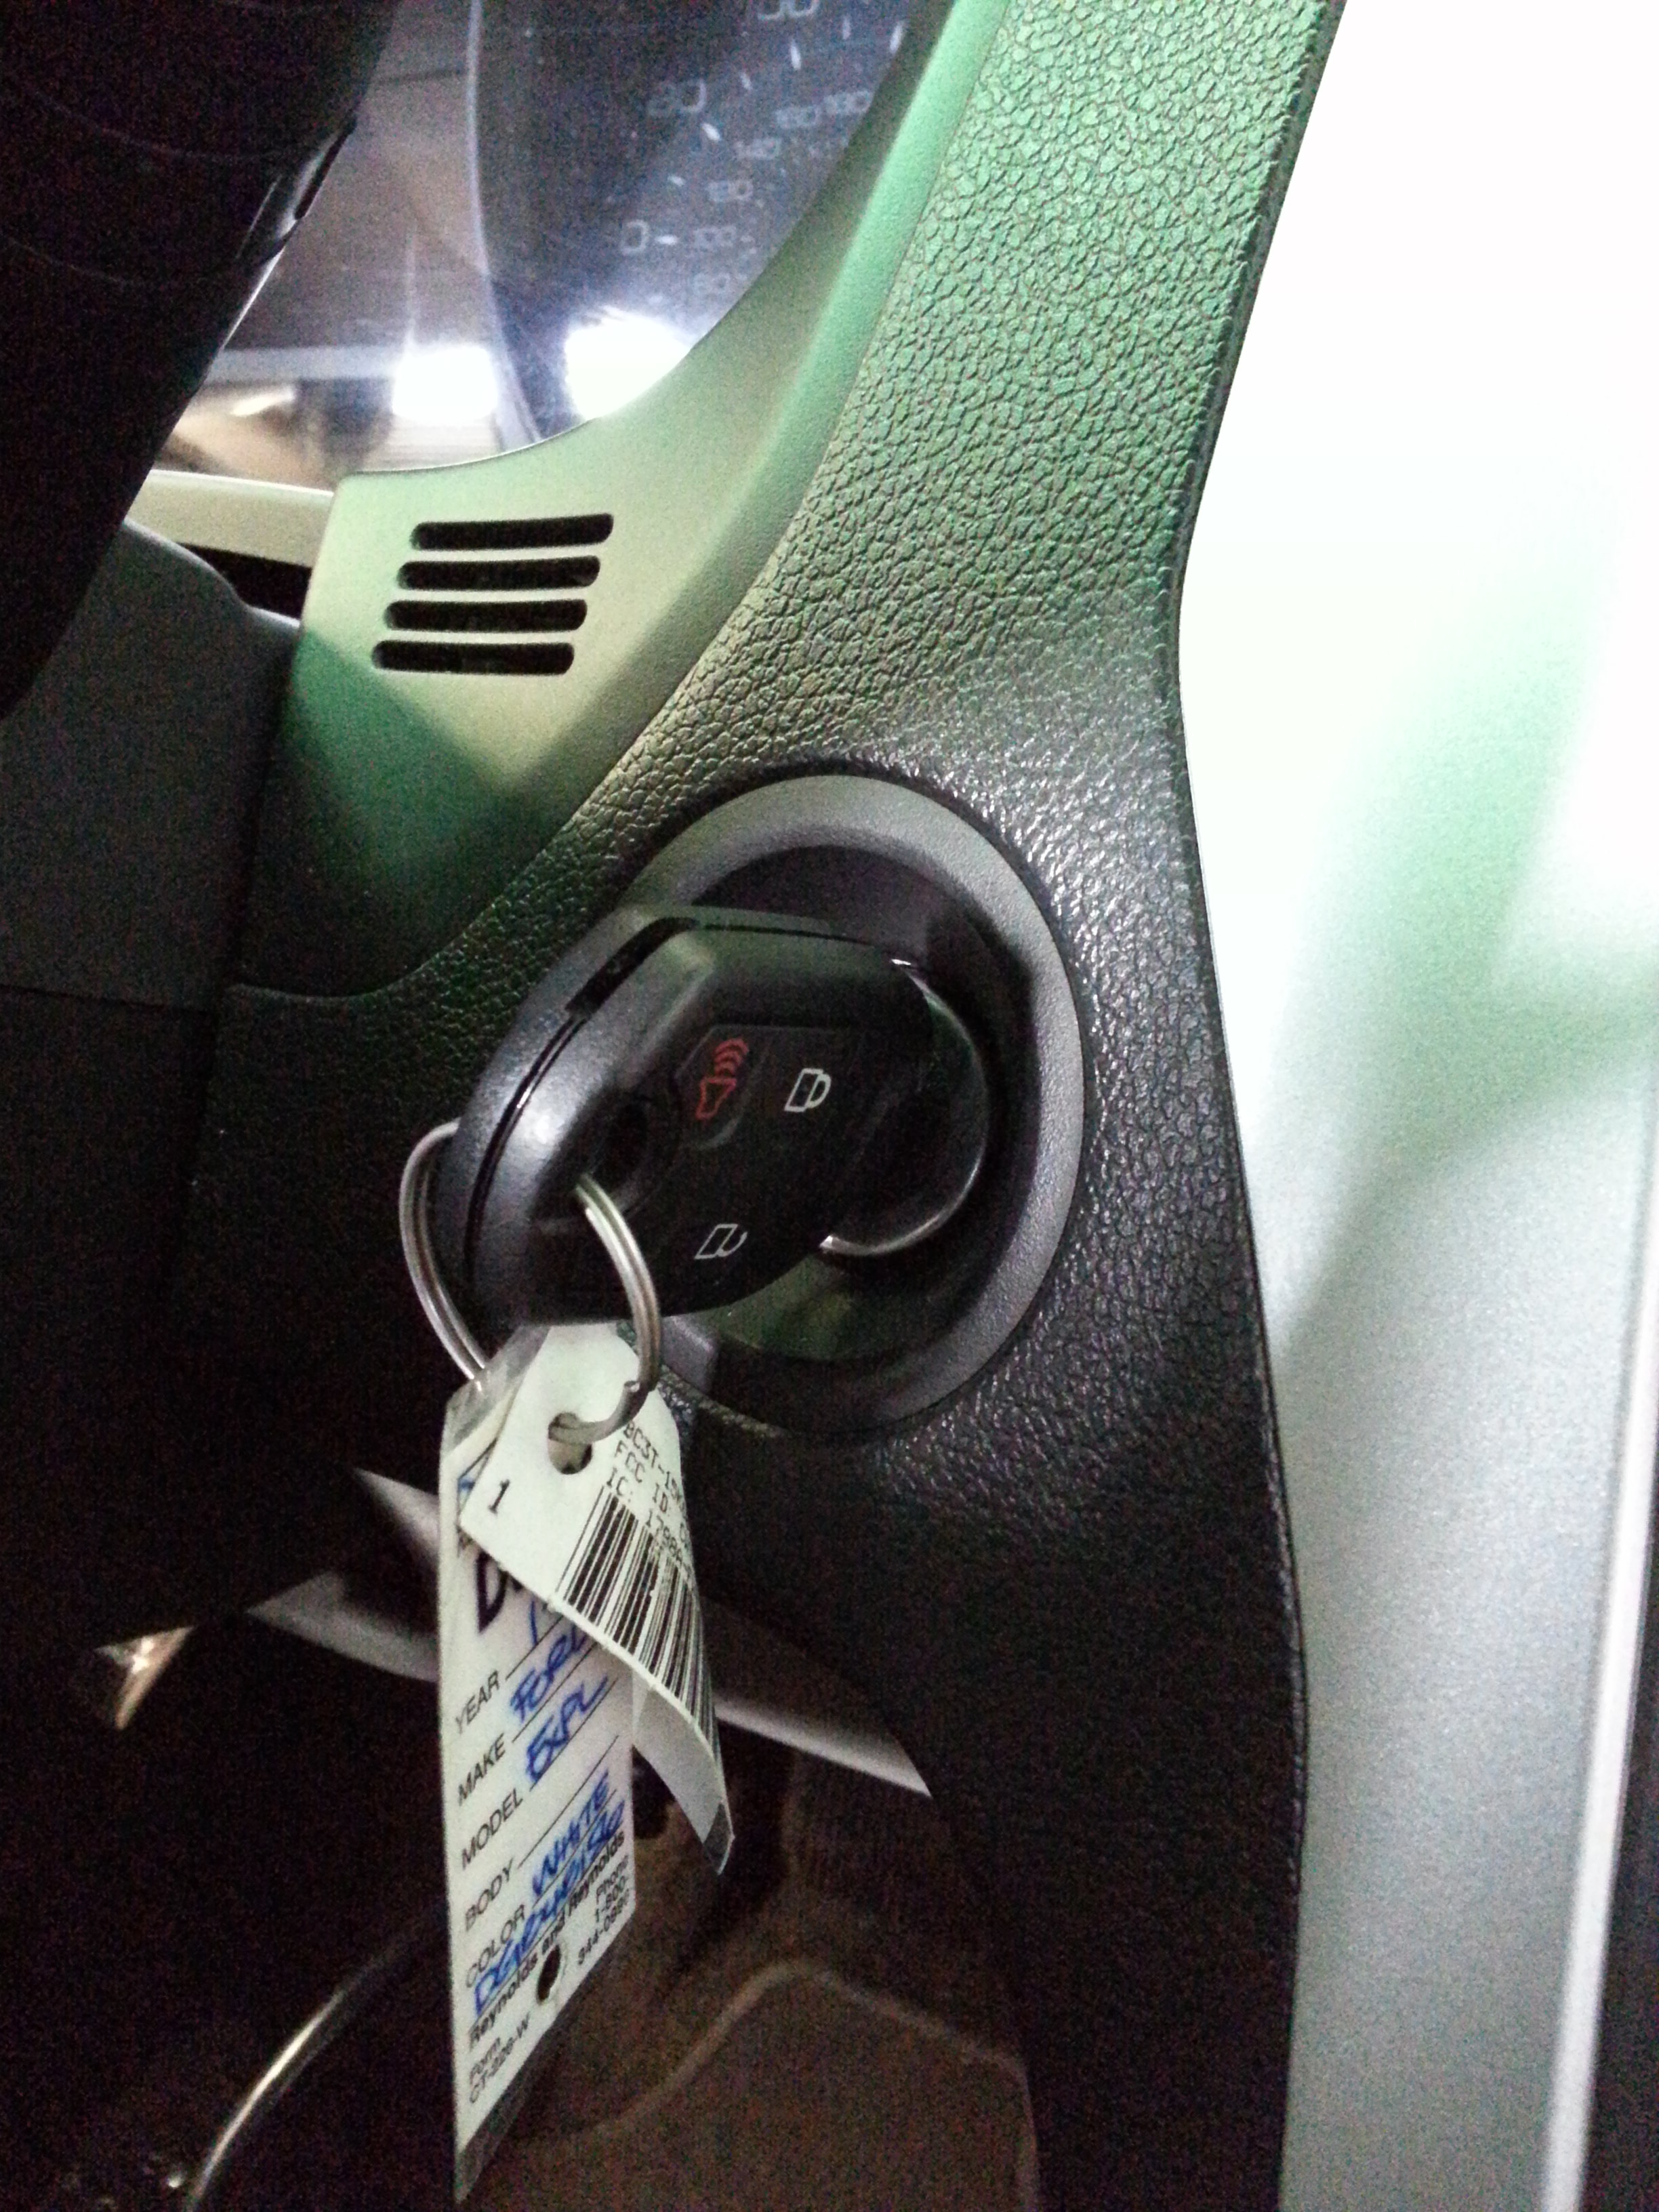
This one came to me for a very intermittent no start.  The customer has been driving it like this since he purchased it a few months ago.  It was becoming more frequent lately.

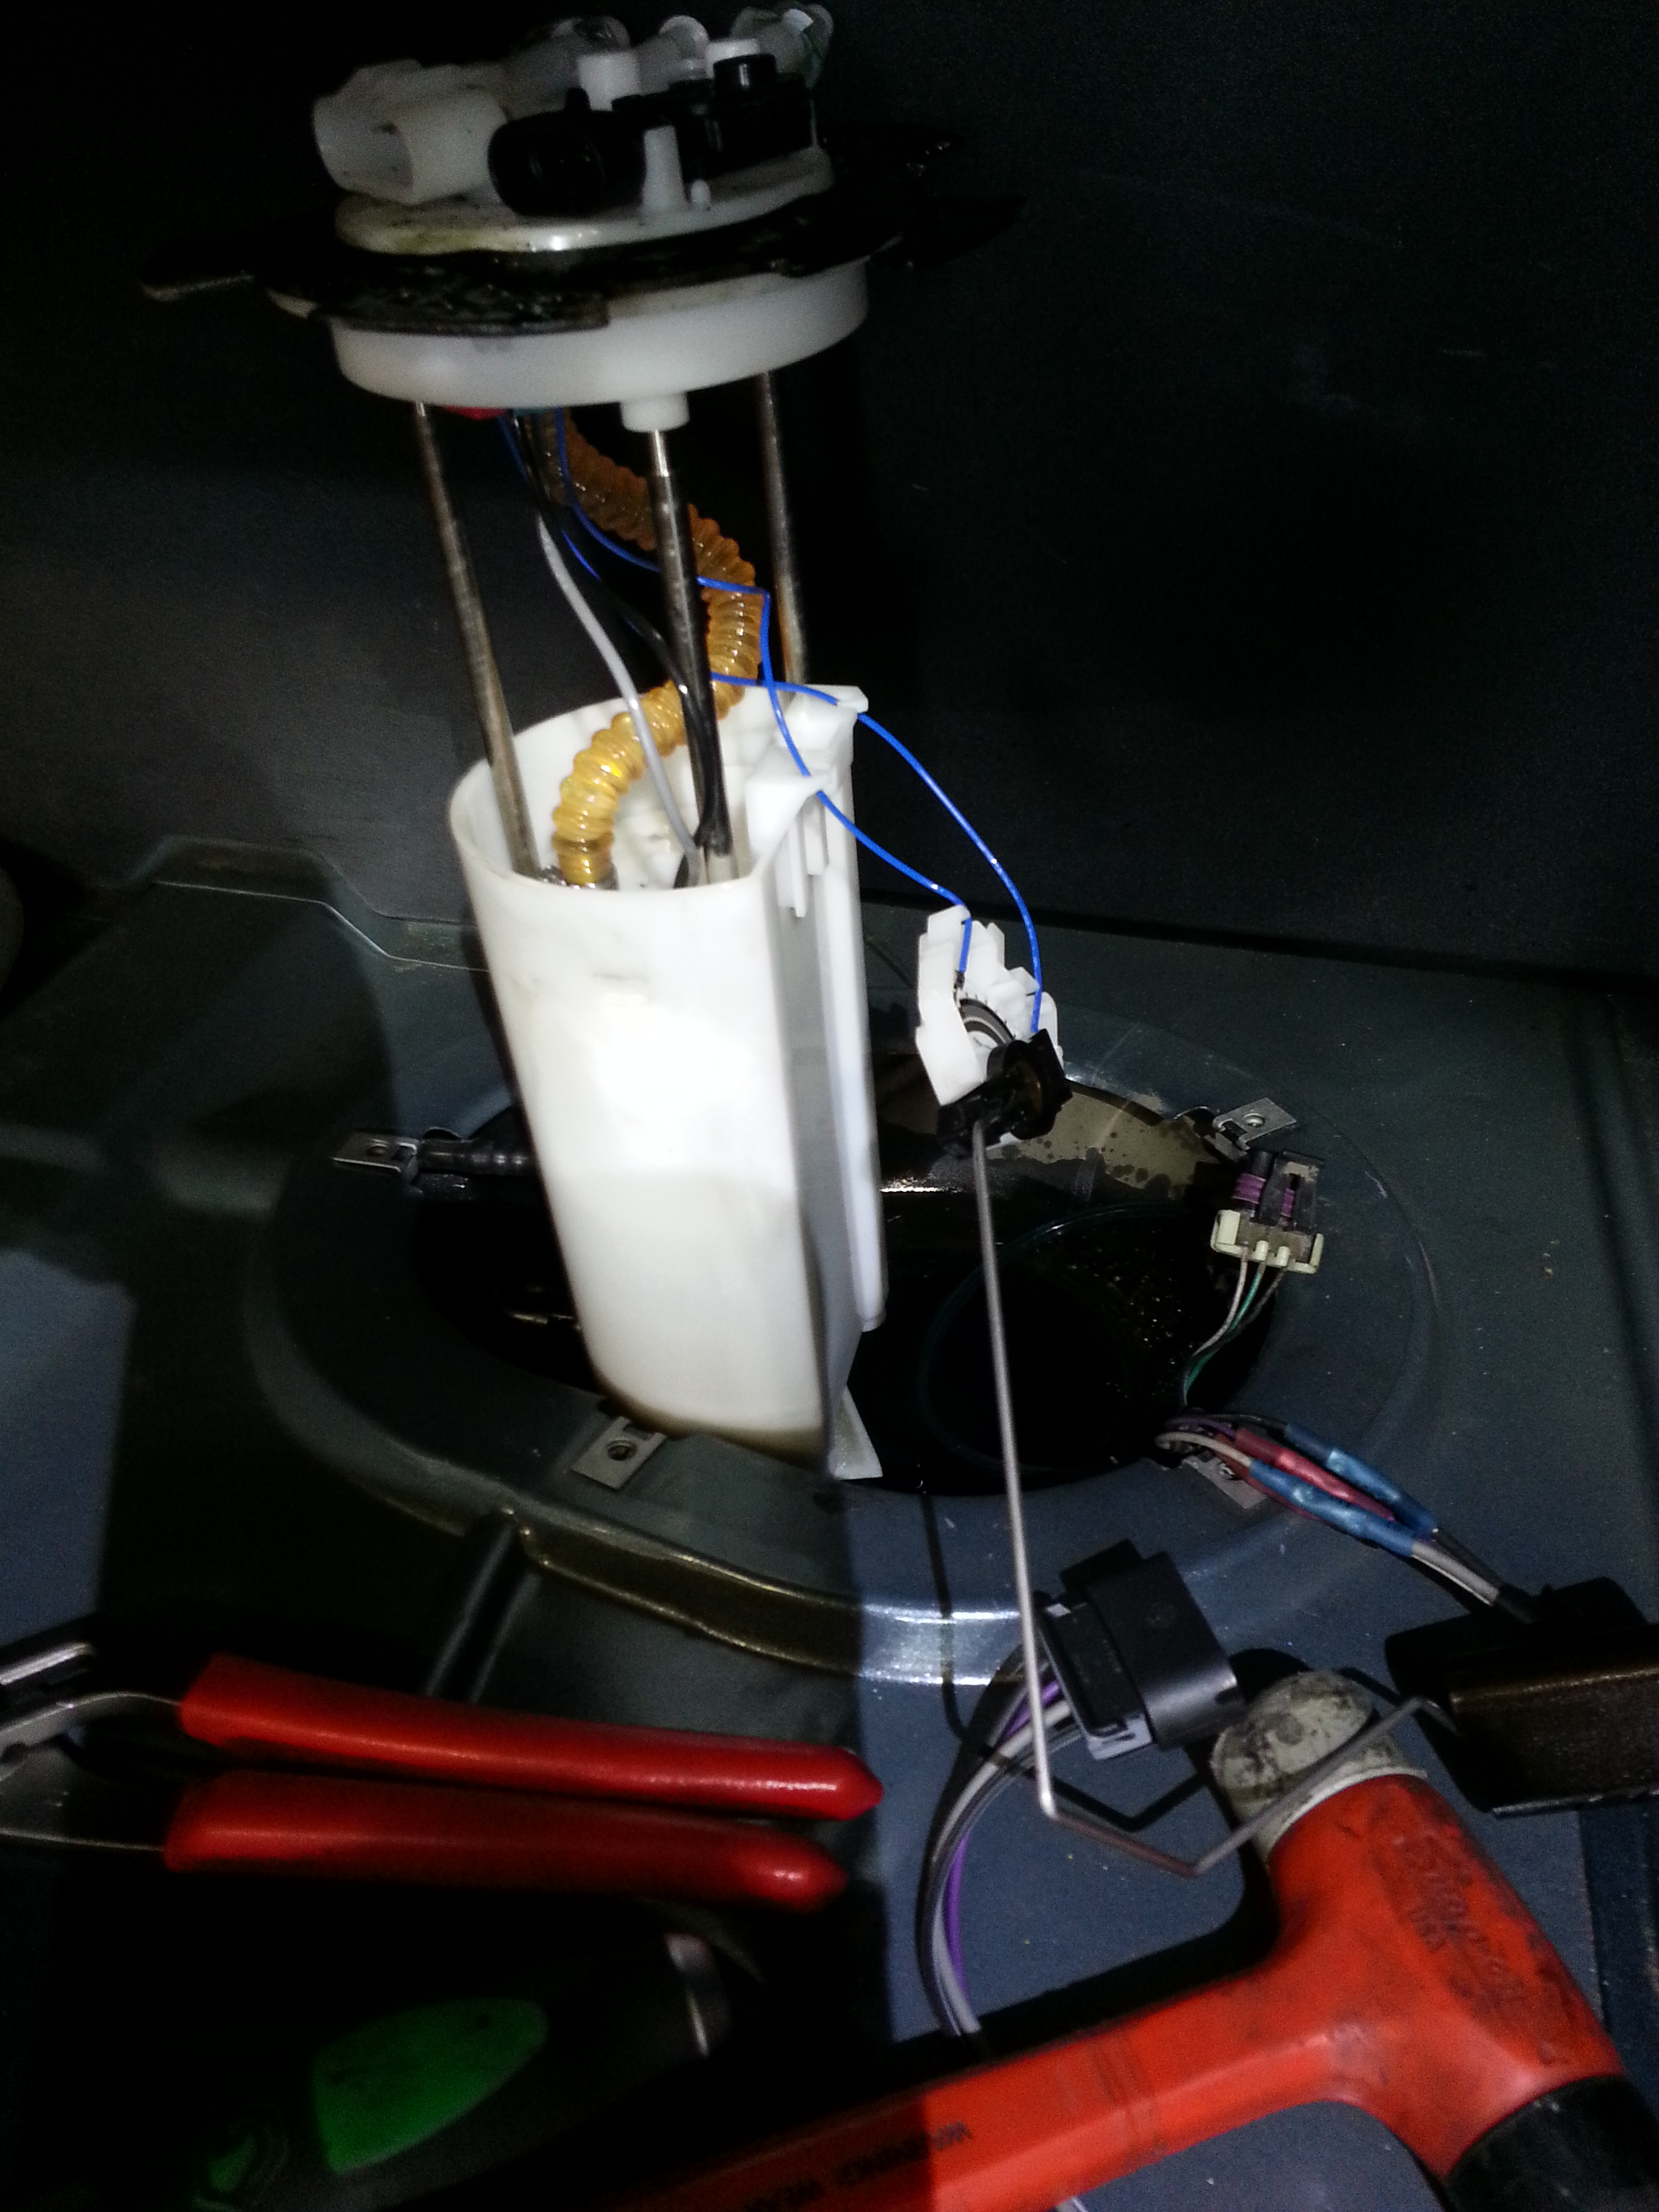
I was called to check it out at his work. The car would crank over but wouldn’t start. The S model is super charged and it requires an hour’s labor just to check fuel pressure and it also requires a special adapter that is Mini specific. I didn’t want to waste an hour of this customer’s money to check fuel pressure. I gave the intake a shot of fuel and the car started and died. I told the customer it will require a fuel pump and a fuel pump relay.

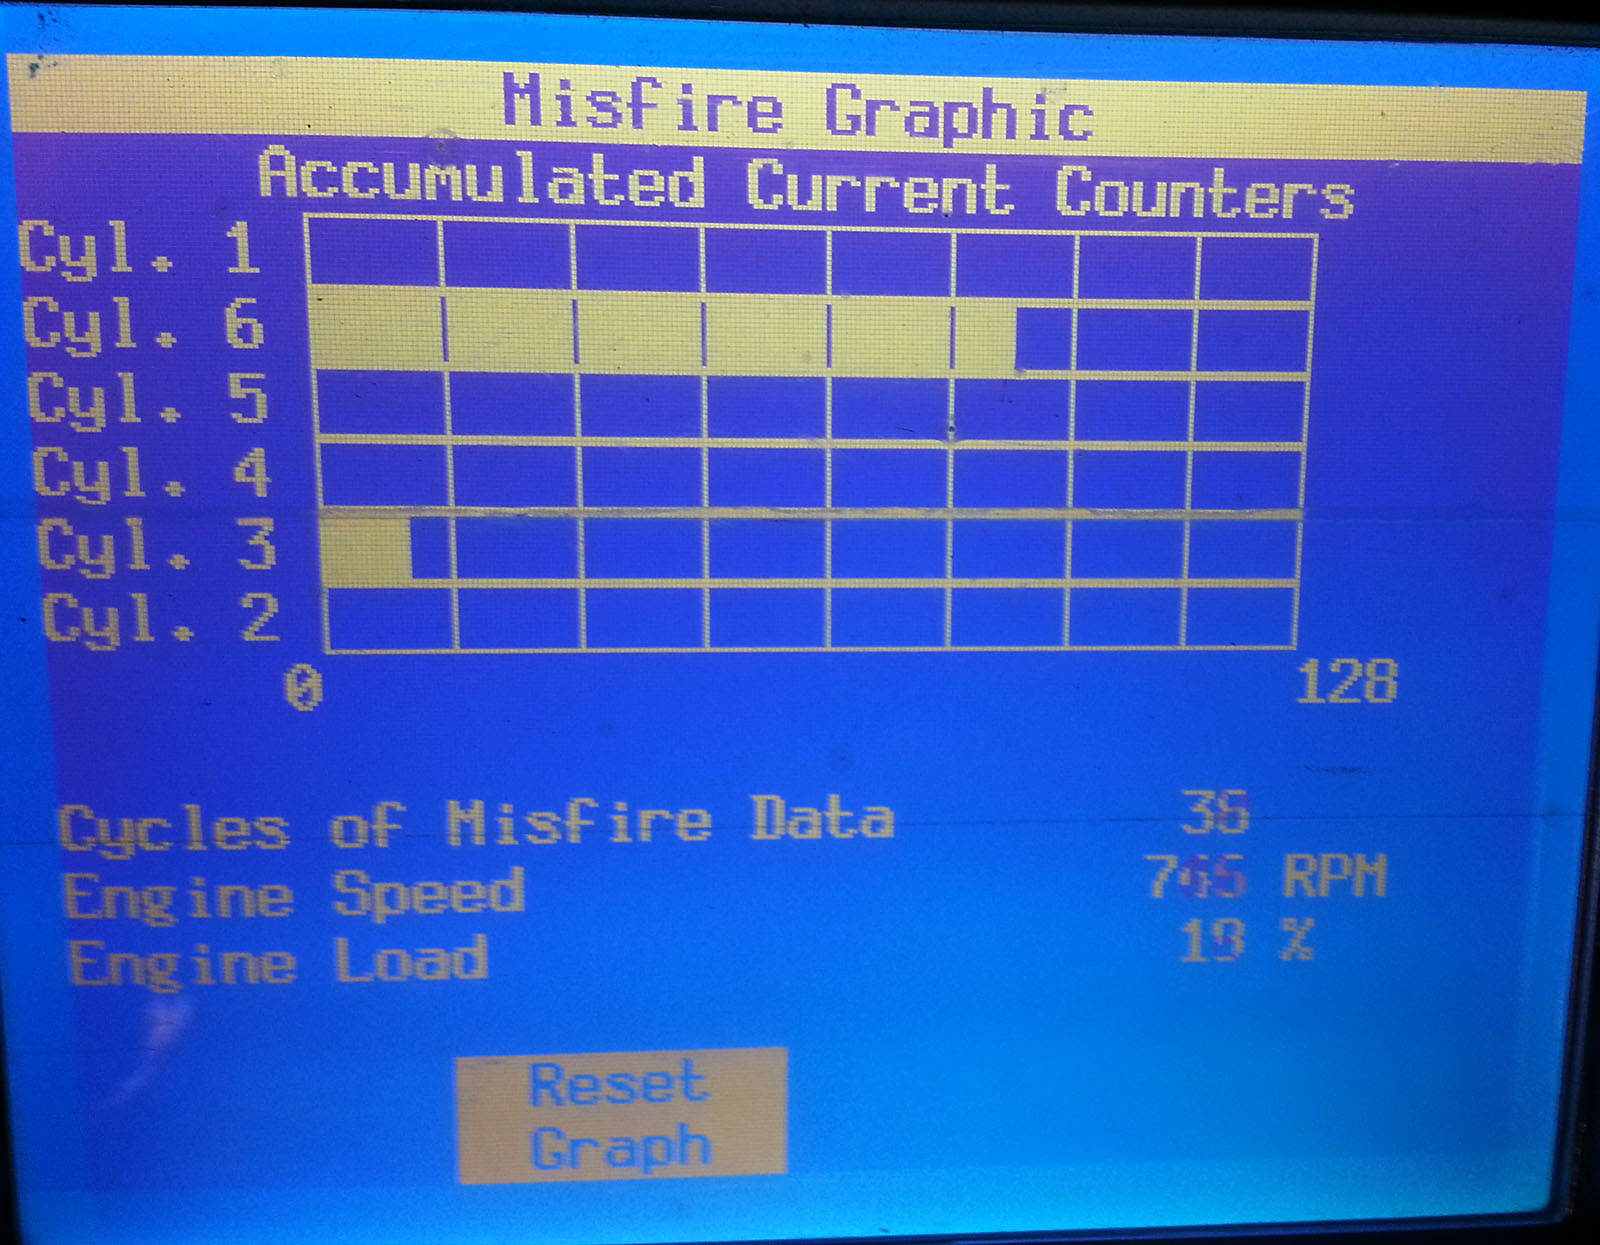
After leaving, the customer called me back and said his car now starts and runs again. Before I left, we discussed the issue with the pump and the most likely cause of this condition. The customer was unsure of my finding, but he decided to trust me and ordered the fuel pump and relay. The parts came in and I decided to current ramp the old fuel pump before removing it. This would allow me to show the owner what I was talking about and why I didn’t want to remove his super charger’s inter-cooler to verify that the fuel pump pressure would have issues, too. Here’s the waveform using my Pico Scope. As we see in this image, the amperage draw from the pump is 5 amps higher than normal. We also see that the commutator segments are showing poor contact at the brushes. We see the pumps RPM’s are low by almost 3000 RPM’s.

It’s clear the pump is bad. The high amperage and low RPM’s are part of the cause of this intermittent no start complaint. The pump’s brushes have poor contact with the commutator segments and are losing the ability to rotate the armature at startup. This causes the intermittent no start problem and explains why it can sometimes still start and run. The low RPM’s will cause low fuel pressure. This can and will cause other driveability problems. This one had 2 stored DTC’s, a P0300 and a P0302. Replacing the pump also corrected these 2 DTC’s without needless replacement of other parts.
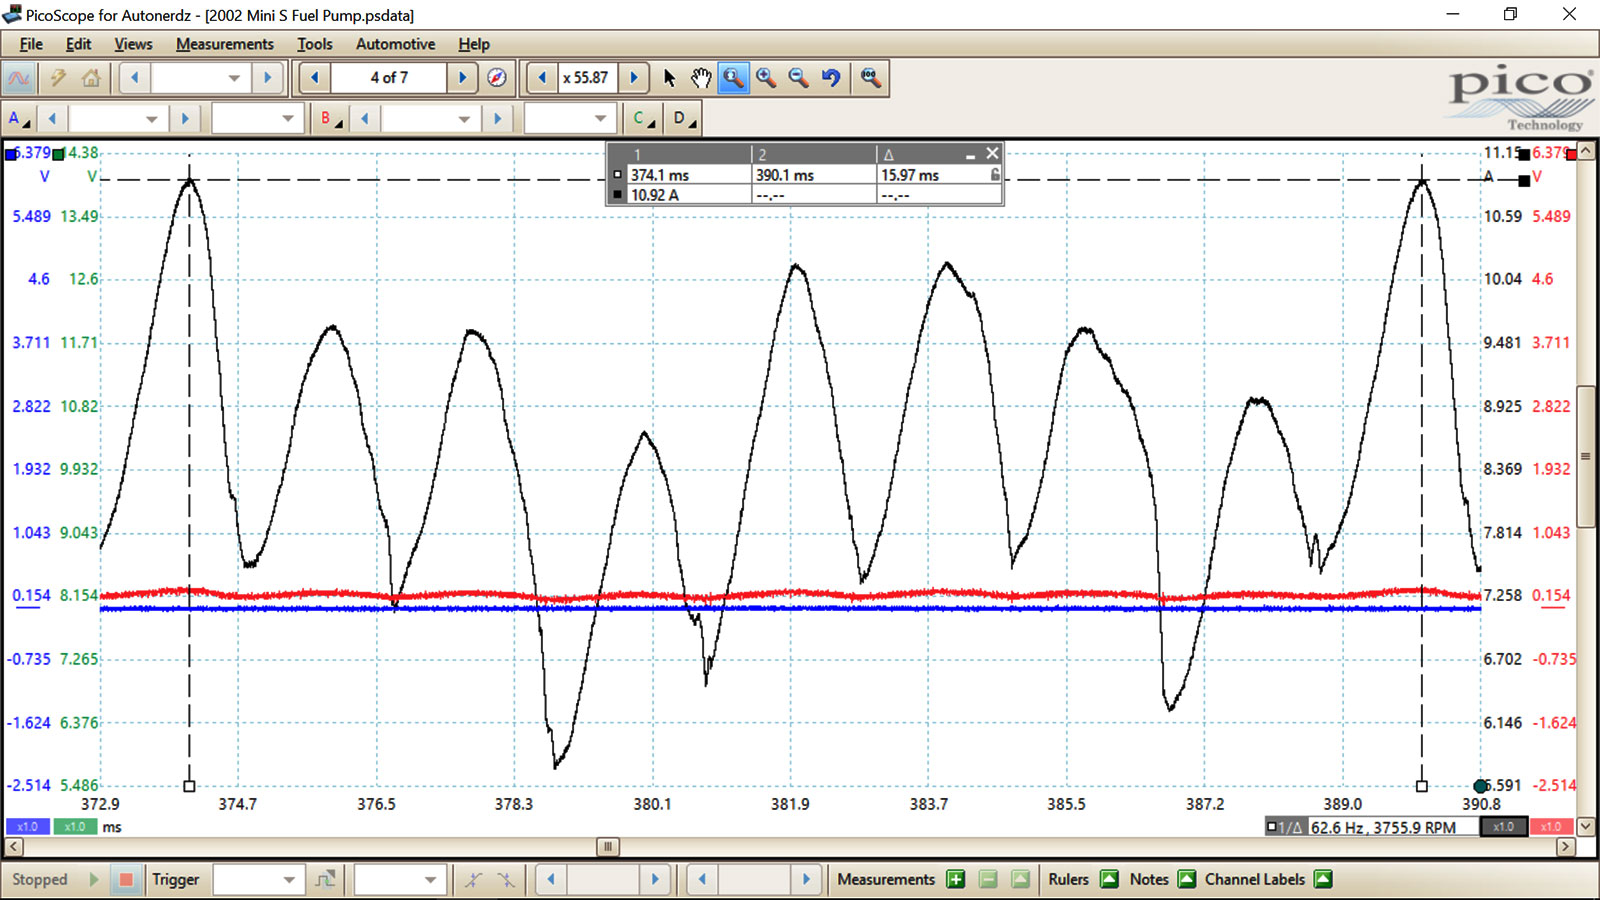
Pico Scope Waveform

This customer is very happy and even called me later to thank me for fixing his car without needing to replace unnecessary parts. He was also happy because we didn’t need to waste money with prolonged diagnostic work by removing the super charger’s inter-cooler to verify that fuel pressure was also an issue.

Sometimes there are better ways to do things and this was just such a case. I always recommend that you know who is working on your car and if they’re qualified to do the work, do it properly without wasting your hard earned money.

2013 Ford Explorer No Start

041115_4077

The Snap-On Verus Pro was able to read all the stored DTC information.

This one was towed in as a no start. The customer had it into another shop and they diagnosed it as a bad starter. After the starter was replaced it had the same problem. They had it towed to another shop and that shop called me to diagnose the vehicle. I do a lot of electrical work for this shop. The vehicle didn’t crank over when the key was turned to the start position. I noticed the DIC was displaying a message for a starting system fault. The other shop told the customer the vehicle didn’t have any codes. I hooked up my Snap-On Verus Pro and found 3 DTC’s in memory. 2 for the PATS anti-theft system and 1 for an ABS fault.
My only concerns were the 2 PATS fault DTC’s. It was necessary to hook-up my Ford factory scan tool to read the key data PID’s for the PATS system. When the key was inserted into the ignition lock cylinder the data PID never switched to key present. I had the shop call the customer to bring down the spare key to see if it was a key problem. The spare key was unable to be identified by the PATS system as well. This lead me to remove the center stack with the radio and heater controls as well as the dash speedometer cluster to gain access to the ignition switch. It was necessary to remove the ignition lock cylinder/switch assembly for testing.

20150407_104517

The PATS anti-theft system transceiver that reads the key’s transmitter ID information.

It was necessary to check fuse F18 and back probe the transceiver. This is a check for the PCM wake up request from the ignition lock cylinder when the key is inserted into the cylinder.
Both the fuse voltage and the wake up request signal were present. The next step was to verify the circuit ground. Without being able to crank the starter to load the circuit, I could only measure it with the PCM wake up command request. The ground looked good and gave correct battery voltage on the load side from the PCM.

041215_4086

Wiring diagram for the Transceiver, BCM and PCM circuits.
Notice the lack of signal information in this schematic. It’s
yet another reason to have the proper tools and education
to properly diagnose today’s complex vehicles.


I used my Snap-On Vantage Ultra to perform a frequency test to measure a change in the signal inputs to the BCM in an attempt to check the transceiver’s ability to send the key input signal to the Body Control Module. It’s also known as the BCM.

The factory diagnostic information does not offer internal module and signal information. Without knowing what the signal actually is, I tried a few different signal tests and only managed to get the frequency signal to respond. The RX signal had no response and the TX signal had 2.60 hz output. I still didn’t know the proper signal info, but with one side unable to respond to the BCM it was necessary to order a replacement transceiver. Unfortunately, Ford and other manufacturers never give internal module control input/output signal information.

20150407_112210

After the repairs the stored DTC’s were cleared and did not reset. This verifies that the repair is complete and the system is 100% functional.

The new Ford transceiver was delivered and installed. The data PID was able to read both keys as present and the vehicle started up without a problem. After installing the transceiver and putting everything back together, I found a PCM update available for this vehicle and the customer was okay with updating his car after fixing the no start problem.

The replacement transceiver signal was 7.85 hz on both the RX and TX circuits to the BCM. This case study will go into my fixed repair files for future information for the next one that has this problem.

20150407_111008

After the transceiver was replaced and everything was put back together the vehicle starts and runs without any further issues.

20150327_155213

After the repairs were completed, the customer authorized a PCM update to the latest software calibrations. This insures proper vehicle operation and eliminates possible software related faults that can’t be fixed by throwing parts at it. No guesswork here!

This is another case study that shows why proper tooling is necessary to diagnose today’s computerized and high technology vehicles.
Code readers can’t give you the information required to do the job right. Throwing parts at the car is a complete waste of time and money. Don’t waste your time and money on guesswork repairs. Find a skilled technician with the proper tools and education to fix it right the first time.

2009 Ford F150 Random No Start

The BJB is the main fuse relay box

The Battery Junction Box – They managed to break every mounting post to get the box opened.

This one came to me through another shop. The customer is a regular patron of the referral shop, but they didn’t wanna tackle it. They are not equipped for this type of work and know better than to take on something like this.  The customer had it into a shop elsewhere out of town and they sold him a $1000.00 PCM to try and fix a random no start.

It was referred to me and I found a lot of damaged wires, broken BJB mounts, pinched wires and general poor workmanship all over this one. They replaced a relay, the PCM and hacked the wire harness trying to resolve this problem. They never managed to find it and after spending $1500.00 plus, the customer was not sure it could ever be found.

Replacement PCM didn't fix it

The new PCM

I came to the customer’s residence and set up my diagnostic systems and started by looking at the factory wiring diagrams. The fault was traced to the load side of the relay they replaced. Without testing the control and source side of the circuit they decided to throw the best guess and most expensive part at the problem. They guessed it was the PCM that was causing the problem and never tested it’s ability to control the relay before spending $1000 of the customers money on it. They guessed WRONG!

I wish I could afford to spend money like that…. Can you afford to ?

The cause of failure

The COF  This simple fuse problem was overlooked. The fuse was overheated from high resistance in the BJB. The simple 12-volt basics were overlooked and guesswork won out.

After looking at the wiring diagram, I quickly found the source of the intermittent no start problem. The fuse was getting hot and the contacts were burnt. The contacts had reduced contact tension which caused a loss of power after the vehicle was driven and allowed to get up to operating temperature. The BJB is in the engine compartment and above the radiator. This would cause expansion and contraction from the temperature changes. These changes would cause the fuse to drop voltage across the terminals and result in a no start condition. After sitting for a few hours it would restart because the contacts were able to carry the voltage and amperage when the BJB would contract after cooling off. It would complete the circuit and the truck would start again.

The BJB is part of the wire harness and it carries a price tag of $1100.00 with a 3 to 4 hour replacement time. It’s a lot of work and an expensive repair for such a minor issue. Imagine the shock from being told this after you wasted $1500.00 on guesswork repairs that didn’t fix anything. Now you need to spend another $1500.00 for the correct fix. That’s double the cost due to unskilled guesswork by uneducated non-professionals.

In reality, this was done by a so-called Dealer Technician. This doesn’t really surprise me as I see this type of work way too often. It’s a recurring pattern in my field.

I was able to correct this problem without the need to spend that $1500.00 on the replacement BJB by moving the circuit to another fuse port in the BJB.  Needless to say the customer was very happy to have it fixed and without spending needlessly. I also did a current ramp test of the circuit to verify it wasn’t an over amperage problem on the load side of the relay. The fuse is on the feed side of the relay and the original fuse never blew. The amperage test  on this 20 amp circuit shows the circuit only pulls 9 amps and is well within the operating threshold specifications.

This Case is closed and with another happy customer. 

Fuel Gauge Problems

This one came to me after the customer became frustrated with the shop that sold her a fuel pump. She had been back to the shop 3 times with fuel gauge problems after they installed the fuel pump. She told them the gauge was inaccurate and wouldn’t read full when it was filled at the gas station. They were insistent the fault was with the gauge on the dash and wanted to sell her a cluster to correct the problem. This one wasn’t cheap. 700 bucks total was the replacement bill. She decided not to have them do the work because she didn’t have any problems before they replaced her fuel pump.

After some preliminary inspection it was necessary to remove the fuel pump to inspect the installation work. WOW!  What a great job. They knocked the fuel level float assemble off of the fuel pump housing. The float was just lying inside the tank moving around at random. It’s not a wonder she had a problem, but 700 bucks would not have corrected this one. Sloppy workmanship was the problem and the shop wasn’t even willing to double check the work they did before condemning the dash cluster.

What a wonderful job they did. Can you afford to waste 700 dollars that won’t fix your car ? This is the result of unskilled labor and sloppy workmanship….

Guess who has to pay to have this problem corrected. Don’t let this happen to your car. Find a qualified technician to work on your car or it could cost you a lot more than you ever expected. Don’t let unskilled labor cost you unnecessarily. 20150205_102248

As you can see in the picture this was caused by someone in a hurry. They didn’t even take the time to check their work and didn’t care about the job they did. The fuel level float was completely knocked off the fuel pump housing. This is not the type of work you want to pay good money for. Then be charged another 700 dollars to try and fix something they caused because it’s easier to throw parts at it than it is to diagnose it. Anyone can hack and butcher a car. Don’t get ripped off by unskilled labor.

This customer is the same owner of the 2002 Thunderbird.

My 2003 Lincoln Town Car started running rough and tripped the service engine light. I called Auto 1 Diagnostic and he came over the next day. He not only checked the code, but did a compete diagnostic check on the compression, fuel system, just about everything. He determined that the problem was a misfire on cylinder 5 and that the coil was bad. Upon further inspection he could see that the spark pugs were old and shot as well.

So, he replaced the plugs, and the coil, and did a service which cleaned out the throttle body and intake from all carbon deposits.Then, he actually road tested the car to make sure everything was good. It now runs better that it has in a long time.

It’s great to do business with someone who actually knows what he is doing, who uses the proper equipment to determine exactly what the problem is, and then shows such great attention to detail to make sure everything is done correctly.

Thanks again!

3RD Time Is NOT a Charm

This one came to me after another shop worked on it for heater blower motor problems. The owner says a shop had installed 3 new blower motors over the last 4 months and was unable to figure out why this continues to be a problem. The first two were from the auto parts store and the last one was an OEM unit from the dealer.  The vehicle is a 2003 Ford E-150 Van with a 5.4L engine. The truck has AC and everything else works normal. After doing a little electrical diagnosis, I found the blower motor has a very low voltage supply on all fan speed settings. The voltage drop measures over 7 volts at the motor plug.

Time to perform some further diagnostic work to trace down the cause of the voltage drop. This lead me to the blower motors relay/control module mounted under the hood.
It’s located in the HVAC case near the blower motor fan to keep it cool when in use. The voltage drop isn’t present on the power feed input circuit, but it shows up on the modules output control circuit. After narrowing it down to the control module and unplugging the unit, you can see why the motor didn’t work so well. The original motor had a high amperage draw and caused the power output wire to melt at the terminals. The shop had it halfway fixed, but fell short and wasted the customers time and labor time to replace good parts 3 times. It’s a parts throwing palooza and nobody is having any fun. Especially the owner.20140915_123540 20140915_123613

As you can see by the pictures above, the control module and the wire harness connector are both melted from the heat caused by the original blower motor failure. It was necessary to splice a new connector onto the harness and replace the heater blower motor control module. The 3rd blower motor was not damaged. It wasn’t necessary to replace it for a 4th time. It’s simple electrical problems that can turn into nightmares from unskilled labor. Customers are paying good money for bad repairs, even if they think they’re saving a few bucks. Don’t waste time and money by using the cheapest repairs you can find. The old saying still holds true to this day……You get what you pay for. Save time and money by fixing it right the first time. Know who’s working on your vehicle and if they are worth the money you’re paying…..

Maybe they’re not!

Improper Repairs and Improper Diagnosis! 2002 Thunderbird 3.9L

Today’s call wasn’t that unusual in the fact that the car had been to a local dealer for a check engine light. The dealer found a DTC P0340 that pertains to the camshaft position sensor. The customer also had a vehicle inspection done. They charged him $139.00 for the diagnostics The dealer told him the camshaft position sensor was bad and needed to be replaced. They also told the customer they were not sure if that was the only problem or not. They said it could be a PCM and that they would need to first replace the camshaft position sensor to know if the PCM would also need replacement. This was at a Ford dealer in Salinas. This is a common dealer practice to avoid proper diagnostics and throw parts at the car without being held accountable for their lack of diagnostic work.

The customer was given a preliminary estimate to replace the camshaft sensor for $680.00 and they would let him know if the PCM was okay after they did the work. This customer had me work on another of his vehicles and had called me for an estimate to do the cam sensor replacement work on this one. I gave him a quote and explained that there is no guarantee it will fix the problem because I didn’t diagnose the check engine light fault. He agreed and just wanted me to do the work as soon as possible.

I set it up for Friday the 13th in the morning and started to take the car apart to gain access to the cam sensor. This is a 2002 Ford Thunderbird with a 3.9L V-8 and the sensor is buried under the cowl and front strut support bar. After removing the necessary hardware to gain access to the sensor and connector, I spotted that the sensor’s plug assurance tab was not closed and the connector was not plugged in properly. I pulled on the connector and it fell out of the other side. I also noticed 2 broken bolts on the valve covers at the rear corners.

That’s when the customer told me that he’d had a Craig’s List mechanic replace the spark plugs and valve cover gaskets a while back and the person damaged and broke the bolts for the coil covers that bolt to the valve covers. The customer said that the check engine light came on after the work was done. He also said he had contacted this mechanic and was going to meet him at his next job to have him recheck the car, but the guy never showed up and won’t answer his phone anymore. He told me this guy’s name is Luke and he’s the 40 dollar guy on Craig’s List. I’ve had the pleasure of repairing other customer’s cars after this guy has caused damage and performed bad repairs on other vehicles.  He’s not a good mechanic by any stretch of the imagination and will stop taking calls when things go bad. Don’t be taken advantage of by this type of underhanded repair scam.

Anyway, I found the problem and it wasn’t a bad cam sensor as the dealer stated. It’s obvious they never did more than pull codes and condemn the sensor without doing any diagnostics. They charged the owner $139.00 to diagnose it and never spent any more time than to read codes. This is why dealers have a bad reputation. On top of that, they did the inspection and told the customer his brakes were good. After I corrected the camshaft sensor issue, the owner asked me if I knew of any way to remove a rock from his brake pads. I told him that I’ve never heard of this problem.

I looked at the left front rotor and could see where it was starting to scrape on something and explained that I would need to do a brake inspection. He said the dealer told him that his brakes were fine. I took the brakes apart and found that the pad had no brake material left and I would need to do a front brake job as well. I finished the car and gave it a good road test. The customer was very happy that I was able to fix his car for much less than the dealer and do the job properly. Don’t let unscrupulous dealers and Craig’s List wannabe mechanics take advantage of you and your car. Find someone you can trust and keep them as your mechanic.  I’m glad that this customer didn’t fall victim to the dealer’s scam and only had to pay a fraction of the repair costs that the Craig’s List scammer caused.

1998 Buick LeSabre No Code Diagnostic 3.8L V-6

Today’s vehicle is a 1998 Buick LeSabre. The customer had taken it to another shop for a Service Engine Soon light and a hesitation on acceleration. The SES lamp was not on when she took into the shop. They couldn’t pull any codes and told her they couldn’t diagnose her car without codes, after having it for 2 days. They charged her 120.00 dollars and told her if the light comes back on, they would look at it again.

Needless to say, she was very unhappy and wasn’t willing to play games with them, that’s when she called me. I assured her I would be able to diagnose her car with no codes, as long as I could verify her complaint. She gave me the chance to look at it. I took it out for a road test and noticed it was misfiring under load and backfiring through the intake.

These are the misfires that were captured during the road test with the GM Factory Tech 2 scan tool, under heavy load.20131127_132211It was necessary to hook up my GM Factory Tech 2 scan tool and re-road test it. I found a steady misfire from cylinder #6 and some random misfires from cylinder #3. I came back to the shop and started a diagnostic strategy based on my findings. This lead me to inspect the ignition system and it’s related components. I was shocked that the other shop was unable to help this customer with her car. They should have at least tried.

This car has a DIS ignition system. It’s a waste spark design.  Cylinders 1-4 share a common coil, as do 6-3 and 5-2.  It has 3 coil packs and 1 control module.  The spark plug wires looked fairly new and the # 6-3 coil had recently been replaced. The customer said that she had work done last summer in 2012. When I did my diagnostic inspection, I found the coil towers for cylinders # 1-4 and 6-3 were heavily corroded.  The spark plug wires were also corroded and the wrong spark plugs were installed. The corrosion problem has damaged the plug wires and both the # 1-4 and new 6-3 coils. Whoever did the work last year failed to use dielectric grease on the plug boots. Moisture accumulated unchecked under the plug boots and corroded the towers and plug wires until it caused high resistance between the coil towers and plugs wires. They could no longer conduct the high KV required to operate the spark plugs during heavy demands on acceleration.

The corrosion on the coil towers.20131127_134916This was a simple no code diagnostic problem and was created by poor workmanship.

If the previous work would have been done right the first time, this would not be a costly and troublesome issue now. The lack of workmanship caused more damage than it fixed. Fix it right the first time and save money. Letting an unskilled person work on your car will cost you double and your vehicles reliability will be lost. Don’t be a victim of unskilled labor.

2007 Chevy Malibu 2.2L I4

Today a customer had called me about his ’07 Malibu. He had the car to the dealer for a no crank, no start problem. The dealer told him that the BCM was the problem, so he authorized the repair for $800.00 dollars. The dealer installed the BCM and called him back to explain that the BCM did not fix the problem. They told him that they wanted to replace the power steering control module because they couldn’t communicate with it and that it would be the the next step for them to repair the car. They wanted to charge another $800.00 dollars to replace the unit, but they couldn’t guarantee it would fix the problem. The customer said not to do anything else to the vehicle and he then had it towed back to his home.

This is when he called me to ask if I could diagnose his car without replacing the power steering control module. I told him that I could find out what the problem is, without replacing anything. He approved my diagnostic time and I came to his home to find out what was wrong. After some preliminary diagnostics, I found no communication with the ABS, the EPS, the Radio, and the PCM  control modules. After checking all the fuses and finding 1 of the PCM power fuses missing,I still had no communication with the Tech2 scan tool or between the other modules.

The system stored the common loss of communication DTC’s. B1001, U2100, D1001, U2000, U2127, U2100, U2103 and some BCM, DTC’s as well. Looks like the dealer didn’t finish with their work when setting up the BCM. I started my pinpoint tests and found a voltage drop of 7.2 volts to the PCM. The voltage drop was found at all the other modules that have no communication. I found 4 fuses in the UBEC that show the same voltage drop.Untitled-1

The customer isn’t ready financially to continue to fix the car at this time, due to the amount of money wasted at the dealer. He asked me if I could come back at a later date to finish the job when his bank account recovers from replacing the BCM that wasn’t needed. I told him I could and probably would be able to  fix the car without replacing any other modules.The voltage drop is the cause of all his communication problems. It needs to be repaired to restore the proper voltage for the control modules to function.


2004 Ford F150 No Start 4.6L V8

I was called into a local shop for this one.  Another shop replaced the motor for high mileage as the customer requested. When the vehicle wouldn’t start after the work had been done, they started to replace parts. A new crank sensor was installed. Then cam sensors were replaced. After trying the parts route they sent it to another shop. That shop couldn’t find the problem and called me in to check the PATS system. After checking the PATS function and finding nothing wrong, I suggested we check the crankshaft to camshaft correlation.  The shop declined my advise. They called me back to program a replacement PCM.  I did as they asked and after the programming was completed, the vehicle still would not start and had no codes stored. I suggested without knowing the base operating conditions, we could throw parts at it forever and never fix it.  They authorized the time to do the CKP/CMP correlation verification.

I found the valve timing off by 15°. The engine builders improperly installed the cam chain by 15° advanced on the crank gear. Both cams are in sync with each other, but they missed the crank timing. This truck has been down for a month and the customer is upset to say the least. Now they are forced to remove the front timing covers and reinstall the cam chains to the proper specs.  This will cause another week of wasted time and the customer is paying for his own rental car.


This LAB Scope image shows the 15° advance of the timing chains. The image below it shows the cams for bank 1 and bank 2 are in sync. This can only be done with a LAB Scope. Replacing parts without knowing what the real problem is, is a waste of time and money. Untitled-1 Untitled-2